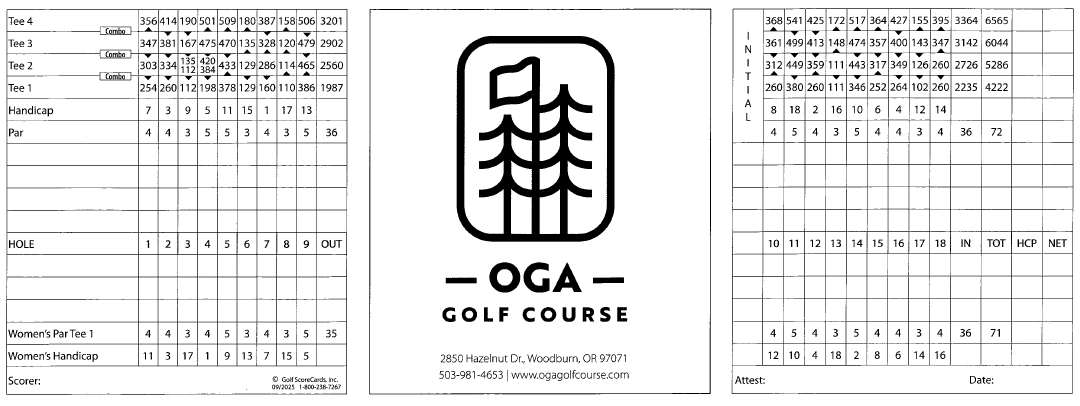
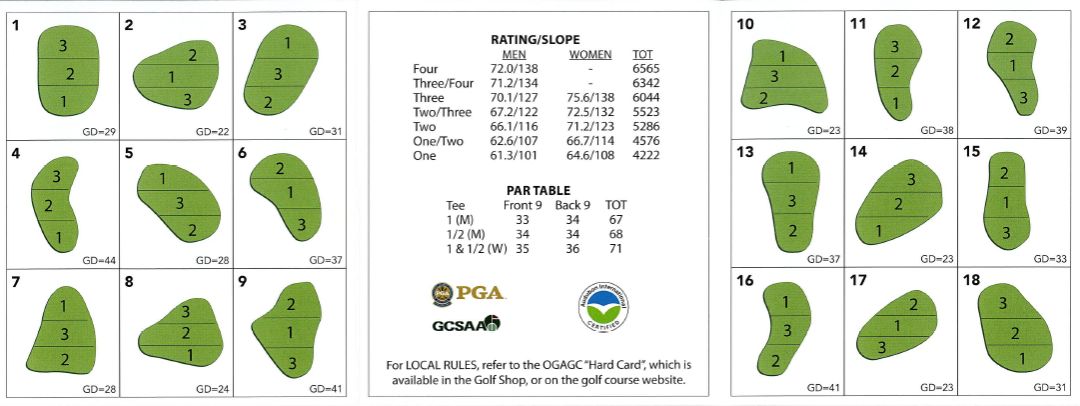
Scorecard
A good opening hole. A tee shot placed anywhere right of the fairway bunker complex on the left will leave you a short iron into this 2 tiered green.
The first of a tough 3 hole stretch. A straight shot off the tee is important as you will want to avoid the water guarding the left side of the fairway and the bunker complex on the right. Make sure to take enough club to avoid the bunkers fronting both the left and right sides of the green.
A challenging par 3 that is guarded by water in front and right side of the green. A safe option is to attack the left half of this green.
Course architect Bill Robinson’s favorite hole on the course. A tricky par 5 that is split by a water hazard 215 yards from the green. Ball placement trumps distance as two well played shots will leave you with a good chance for a green in regulation. Pay attention to pin placement on this deep green as the back right portion falls away quickly!
A straight away par 5 that offers a good birdie opportunity for both long and short hitters. Play your tee shot down the left side of the fairway to have a flat lie for your second shot. While long hitters will be able to attack this hole in 2, shorter hitters will have the option of laying up to their preferred distance to attack the pin.
The depth of this green (40 yards) makes club selection critical on this straightforward par 3. It is safer to attack the right half of the green to avoid the deep bunker guarding the left front side of the green.
A demanding hole that requires a well placed tee shot. Golfers who get greedy for extra yards off the tee could find their ball rolling through the fairway. Aim between the bunker on the right and the 150 yard stake in the fairway to get an unobstructed second shot at this green that slopes gently back to front.
A good par 3 with a generous sized green. Be aware of the prevailing wind that you might be hitting into during the summer.
Take advantage of the large landing area by aiming just right of the bunker complex on the left side of the fairway. Long hitters can try to reach this large double green in 2 while other players can choose their favorite lay up distance.
A tee shot placed on the left side of the fairway will keep you away from the pond that guards the right side of the fairway. A relatively flat green means that a second shot aimed towards the middle will leave a good birdie opportunity.
Steer clear of the bunkers on the right side of the fairway and you will have a good look at the rest of this dog leg right par 5. Avoid the thick rough and deep bunker that guards the left side of this 3 tiered green that slopes from back to front.
A long par 4 with a large fairway that encourages you to swing away off the tee! Consider clubbing up for your approach shot as the prevailing Nor’ Western wind will often be in you face during the summer.
This large green is protected by water all the way down the right side. 2 large tiers on this green require that you check the pin placement to best select the proper club for you tee shot.
A challenging par 5 with a water hazard running the length of the left side of the fairway. Target the landing area to the left of the bunker complex in the right rough. From there, pick your favorite lay up distance to attack this steep 2 tiered green.
A generous fairway allows you “grip it and rip it” off the tee. The front half of this green that slopes back to front is well protected on both the right and left by deep bunkers. Attacking the back half is a safe play.
Everything is in front of you on this long par 4. A tee shot placed on the left side of the fairway will leave you the best look at this tricky green. Taking extra club into this elevated green is choice that will usually pay off!
A short par 3 that plays about 1 club less than listed distance. The green slopes right to left and it is important to be on the same level as the pin to have a good look at birdie. Beware of the pot bunker in front!
Placement is essential for your tee shot as out of bounds stakes protect the right side of fairway with bunkers and water guarding the left side. A good approach shot will be placed on the pond side of the pin to avoid a down hill putt that breaks hard towards the water.
Hole #1
Hole #2
Hole #3
Hole #4
Hole #5
Hole #6
Hole #7
Hole #8
Hole #9
Hole #10
Hole #11
Hole #12
Hole #13
Hole #14
Hole #15
Hole #16
Hole #17
Hole #18


